Last updated on April 22nd, 2024 at 01:43 pm
Food styling and baking have always been a passion of mine. Growing up I would spend hours pouring over recipe books in awe of the styling and the captures that sat next to mouthwatering recipes. I am no chef nor am I any good at actual cooking but baking has always been easy for me. Along with baking came my passion for setting the scene and styling my creations to share with all of you. At first it started off with just one or two finished photos of my baking but quickly became an obsession with props, angles, and lighting. I have had so many readers ask me for advice on how I style and photograph my food for my blog. Half the time, I used just my iPhone to capture my baking creations and I know everyone wants to hear that it’s because of a nice, fancy expensive camera but it’s just practice. I STILL need lots and lots of practice and playing around with props and lighting for my photographs before I will ever be completely satisfied with them. Someday I would love to be a food photographer for a magazine or cookbook but until then I will keep practicing and sharing them on LTM.
So I thought I would share with you all my here top 5 tips for food styling, in my opinion, as I said I am no professional but this is what works for me.

1. Set the scene before you bake or cook
I usually think first of the ingredients of a recipe, the color palette of that recipe, and what props I would like to used for the photo. I set up a little space whether it’s on the floor, counter, dining room table or on a piece of white card stock paper. This is your background so I choose wisely and then starting building up from there. Think of the color of your baked or cooked recipe, if it’s orange soup use a blue bowl as they are opposite on the color wheel and will pop in the photo. I then choose a platter or a plate to serve said recipe on accordingly. Then I think in terms of what my recipe is and other props I could use. Flowers are a great prop with food. If it’s a brownie possibly a miniature glass of milk and a straw in the background. If it’s soup possibly soup spoons, napkins and bread & butter to the side. Your props are endless and you can use anything around the house as props. But I get an idea of what I want the end result to look like and set the scene so that whatever is coming out of the oven or off the stove, I already have things set up to start snapping and rearranging.
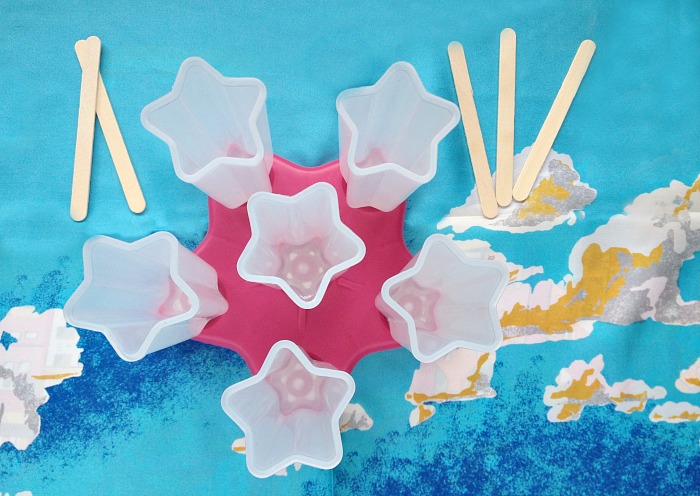
For example, this Neapolitan Yogurt Popsicles I set the scene with popsicle sticks and empty containers and used an old scarf as my background on the counter. I had it right up to the window to use the natural lighting. I always snap a few photos for each step of the way even if I don’t ever use them in my blog posts. It’s great practice and helps you decide what setting on your camera is good for the lighting and scene in front of you.
2. Snap photos in the process
The second step, snap photos as you bake and cook. You can make some amazing captures while mixing batter in a bowl, or cutting up the ingredients for your recipe. Sometimes recipes are complex and it helps to have various photographs of each step so your reader knows what you are asking them to do. Other times, these ‘captures in process’ turn out to be your best photos!
For example, this photo is from my Flaky Apple Cinnamon Squares recipe. I love the flour on the coutner top and the cut apples and seeds to the side. It also shows my readers how I want them to cut and assemble the squares before baking.

This is another example, as my easy Lemon & Salmon in tin foil is stacked on top of each other before I close the tin foil all the way. This shows the readers what to do but I also think it looks lovely with the green and yellow popping from the salmon color below.

My last example is with my Cheesy Bacon Twists, which are so delicious but I preferred some of the before photos to show the ingredients off. It’s hard to see the brown sugar, rosemary and grated cheese on these after they are baked even though you can very much taste them, readers want to see what they will be getting as an end result. This helps them taste it through sight.
3. Use everything around you to style your photo
The word “prop” really just means anything around you. As I mentioned earlier flowers are great to add to any photo. Using whole pieces of the ingredients of a recipe is a prime prop, like a whole apple next to my apple squares above or a whole pepper next to a recipe that may have some diced peppers inside it. If it’s a meal, set the table for two and take a whole scene. It doesn’t have to stop at just one plate or one bowl. If it’s a treat take an action shot with one of your children taking a bite or reaching across the table for it. Hands and people are great props in food styling. Use your home accessories for props. A book, a postcard that has words on it, a pen if it’s a biscuit and coffee type post. Maybe you are in the middle of writing a postcard to someone and have your coffee and baked goody next to it. Styling food is so fun because you get to use your imagination to no end.
For example, in my Butternut Squash Soup recipe post, I set the table for two and had two bowls and spoons set out as if I was having a nice lunch with someone. Below I added a mini glass of milk and some bread and butter to set the scene. Think of your food styling as a scene to something and envision what that scene looks like. I try all sorts of variations and styles for each recipe. 
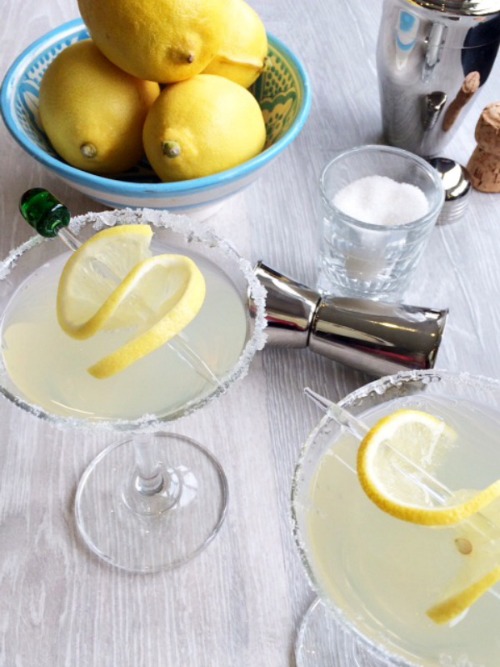
Another example is my Fizzy Lemon Cocktail recipe which was a favorite shoot of mine. I used everything in the recipe as backdrops and accessories to the photo. From the shaker, whole lemons, to sugar in the shot glass. It’s cocktail hour and I am setting the whole scene not just focusing on the actual cocktails but they are very much the focal point still. Even close ups of how I iced the rim of the glass was shared.
Another example is in my Raisin Croissant Pudding post I added flowers from my mother’s garden. I had the sauce and whole croissants set to the side to show you what’s in the recipe along side it’s finished product and a big spoon. Spoon, forks, spatulas, and graters; any kitchen gadget you use for that particular recipe is great for photo props. A flour sifter is a common one to use too. Try to buy miniature versions of these as they tend to fit better in the frame. I have numerous small dishes, miniature cups and utensils. Even the cocktail glasses above are miniature size but appear normal size in the photo.

4. Take photos from various angles and lighting
My best advice is check your lighting and angles before and while you are photographing. I always try to turn off any lights in the room and use all natural light which means you need big windows or to be as close to the window as possible. My house is murder for lighting too so I also have to use a light reflector to help bounce the natural light back onto the scene so I don’t have shadows. Unless that’s the look you want, some people are amazing at gorgeous shadow effects on food styling. I haven’t got there yet, more practice and advice on that at a later date. But for now for bright and airy photos I use the window and light reflectors. You can get them on amazon so cheap. Or even just use a tin foil wrapped around a piece of cardboard. Either way, I pull a table straight up to the window and wait for the best natural light of the day to set my scenes. You don’t want direct sun as it changes the lighting and colors of your photos. Overcast but bright days are best. I love using different angles too. I always start off straight overhead looking down onto my scene, then I take photos at a 45 degree angle from all sides, zooming in and out of the scene and moving props around as I go, until I am happy. Then lastly, I take a few looking straight across the scene and zooming into only corners and pieces of the scene to capture the detail. Maybe a close up of the spoon, or a shot glass or a bite taken out of the recipe.
Like I did here, this is straight overhead looking down at my Fruit Puff Pastry Tart. I have used flowers and powdered sugar on parchment paper to set the scene behind it. 
Another example is looking almost straight across at my Balsamic Watermelon Salad recipe. The grass in the background made it appear like a picnic on a hot summer’s day. It helps set the scene for me. This is harder to do indoors as you usually have something in the background that isn’t a good backdrop or doesn’t help set the scene that may distract from your actual recipe. Always look beyond and behind your immediate focal points so that it is free of clutter or anything unrelated to the recipe.

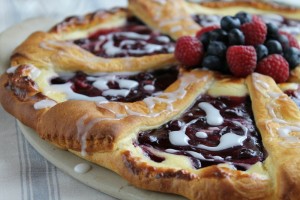
This is an example of forty-five degree angle shot from my Blackcurrant Croissant Cheese Cake recipe. It’s focusing on the detail and cutting the background and the sides off so you have to stare right into the delicious berries and pie filling. This is probably the most popular and most common shots in magazine that I see. It always seems to be my favorite shots in my own food styling too. 
5. Take a bite, cut a slice, scoop it
I also recommend getting involved with your photos. Test out your creations, take a bite, cut a slice or two, or scoop it and use that as your captures. Put those props to work for you in your photos. If it’s soup put your spoon in the bowl and then set it on the side of the bowl so you can see the dirty spoon. Don’t be afraid to make a mess of your scene too. Spread flour or sugar at the side of your recipe, or have sauce dripping off the plate onto the table. It gives it detail and makes you interact more with the scene. Have a hand in the photo, holding the fork with food on the end and the finish product in the background blurred out. The options are endless. Make your photos work for you too!
Here, I scooped out a spoon full of my Blackcurrant Cheesecake Homemade Ice Cream in the ice cream scooper and set it on a cutting board so you could see all the ingredients in the ice cream. Then I grated some chocolate and left some whole pieces next to it to create a mouthwatering effect for this capture.
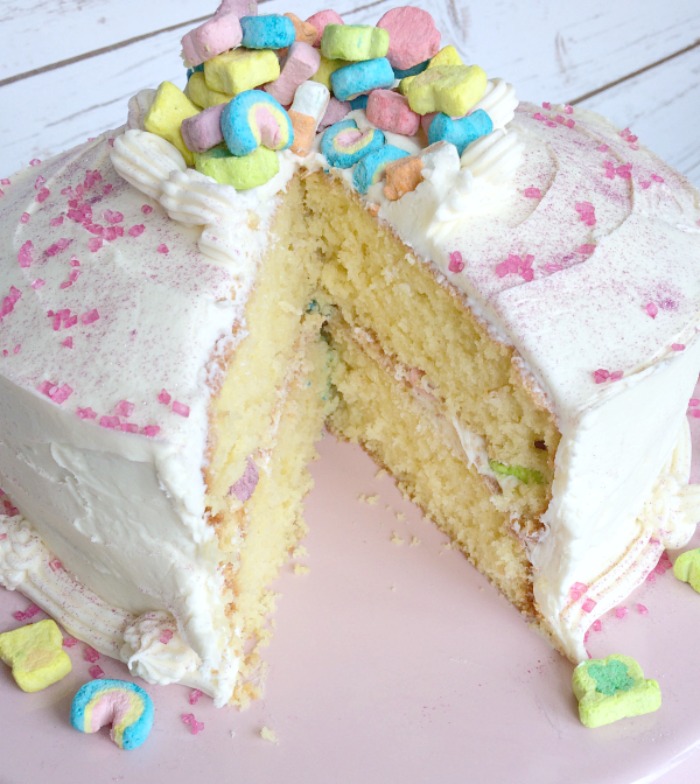
Another example of this is cutting a slice out of my Lucky Charms Cake. I wanted to show that there was a layer of frosting and marshmallows in the middle of the cake. It also shows how deep and tall the cake is with a slice cut out. Sometimes putting a slice on a plate next to the cake is a great capture. You can focus on the slice with the main cake in the background using the actual cake as a prop too.
The beauty of food styling and photography is there is no wrong or right way. We all take photos differently and with different devices it’s just playing around to find your style and what works for you. I hope you have enjoyed my tips and what I do when styling my recipes. If you love to style food photos, I would love to hear what you do and if you do things differently than I do. Please comment below.
Linking up #TastyTuesdays at HonestMum
It’s the time of year again….
Please vote for Let’s Talk Mommy for the Bibs2015 Awards for Writer & Family!


great post. i also love to bake and take photos of my creations…..your suggestions will come in handy next time I’m in the kitchen.
Thanks Laura. Glad you like it. I always like to share what I learn as I go along. I still have so much more to share and learnt too in the process.
Great Tips Jenny, thanks so much for sharing, I have been really trying hard with my images at the moment. I mean I wont pretend they are anything like yours, they are stunning, but they are better than when i started a year ago!! 🙂
Thanks again for sharing x
Thanks Becky, oh don’t worry I only started 20 months ago and if you look at my first photos they are completely awful. It just takes practice. I have so much to still learn and practice on too.
I’ve always really admired your photography, these shots are absolutely stunning. I’m definitely bookmarking this post for my new food post 🙂
Oh thank you Toni. That’s so sweet of you to say. Made my day. Glad you liked it. Always like to share as I learn too.
They really are gorgeous pictures! Such helpful advice. I’m very much a beginner but have defiantly improved my food pictures in the short month I’ve been blogging. Still v embarrassed about my first one! This has given me so much more helpful advice, thank you! #tastytuesday
Oh glad you like it Hunny!!! I am still a beginner too. I would love to get better at cooking and baking so I can practice more. Glad to pass what I have learned on and keep learning so I can share more.
These are great tips Jenny, you style so well 🙂 Interesting tip about buying miniature utensils, cups etc- I would never have known those glasses weren’t full-sized! #tastytuesdays
Thanks Becky. Yes miniature items fit into the frame better but look normal size.
You are brilliant! That is all I have to say. I wish I had your eye and patience! It is very much a huge skill and you are fab at it!
Thank you so much Vicki. That’s so lovely of you, you made my night.
Some really useful tips there, will definitely have to try them. Your photos are gorgeous
Thank you Alison. Glad you liked my top tips and taking some on board. I love sharing the things I am learning. I still have so much to learn yet though too.
Wow, those are actually really great tips Jenny!! You make me want to bake/cook something just so that I can take photos. #tastytuesdays
Aghh thanks darling. Glad you liked it and found it helpful. Yes do its so fun. I need a chef so they can bake and cook and I can just style and take the photos. Lol wouldn’t that be the life? Bliss.
Such great tips honey, thanks for sharing 🙂 My biggest problems with food photography is poor light in my kitchen (really poor!) and also the fact that my island is a dumping ground and almost never clear enough to set a scene. I always think about the photos last, but need to get into good habits and be thinking of the photos before even starting to cook!
Yes that’s what I do. I have horrible light to. Think outside the box. I have takes a side table into the front living room pushed it against the window and set the scene there with the plate and goodies. Don’t let your kitchen limit you. Use your whole house or even outside with a side table. So fun to get creative.
This is such a helpful post Jenny! I’m not so much into Food Styling, but i think alot of these tips could be applied to taking pictures of other things too. I’ve definitely learnt lots! Thankyou chicky xx
Thanks hunny. Oh yes these could be used for reviews and product photography too. I think the concepts are the same all around when thinking in terms of light, angles, background clutter etc. Glad you liked it.
Wow Jenny you are making me want to make more of an effort! I don’t really do food on my blog but if I ever start I am definitely going to use these tips!! Years of pouring over recipe books have paid off! x
Thanks darling. I don’t know I still have lots to learn but have come along way just look back at some of my first recipes it’s so embarrassing but all part of the journey. lol
These are all SO GOOD! I am terrible at styling photos of any sort and I am also a terrible cook but I will definitely be trying my hardest to remember these tips the next time I’m trying to capture something tasty!
Thanks Charlotte. The beauty is you can apply these tips to product and review photography as well.
Wow, those are actually really great tips
Thank you. I love learning all about all kinds of photography and putting it to practice.
These are some really great tips, thanks. Food styling is something I really struggle with as I am not naturally artistic. I really want to improve it though so will be putting these ideas to work..
Oh Emma I am not artistic at all. I don’t do craft what so ever. Honest and food styling is just a thing you practice and learn I think. It doesn’t come naturally. Just look at some of my first recipes so embarrassing but they are all part of the journey and it’s not been long since I was snapping horrible food shots. Promise you could do it too.
I loved reading this Jenny- I think you are oh SO talented when it comes to food styling. It’s been a pleasure watching your journey as your passion grows and grows. I still need me one of those lucky charm cakes. 😉 x
I will mail you one Hunny. Lol thanks so much for all your love and support.
You are amazing at food styling. I would love to one day take food photos like this but for now they are purely the best photos I can take of the things I make with limited staging. When I have time to set the scene a bit more I will be doing exactly this – great post! x
Thanks Donna. You are good at it too. I think sometimes it’s just thinking a little outside the box or getting an idea of something before you bake or cook.
Great advice, lovely. You’re right: pretty much anything can be used as a prop and your photos are beautiful! x #TastyTuesdays
Thanks Mel. You are sweet. Yes props are anything and everything right down to the twigs outside my house. Hahaha I use it all.
Wow Jenny I really loved this post. Absolutely brilliant tips. I need to do more with styling my food I have an artificial grass rug in my conservatory and use that for ALL my food pics and it gets a bit samey you know? I think i need to get some wooden boards from somewhere for sure and perhaps some prettier bowls etc. Oh the possibilities are endless. Such food for thought (pun intended!) Thanks my love xx
Food for thought indeed my lovely. Sounds like you didn’t need any tips from me. I love going to the fabric store and getting fat quarters for background drops. Your backgrounds are endless that way. Or place mats too. Wooden cutting boards are also a great one. I could find a prop in anything I think. Lol
Okay, so we know I will never be a good blogger, but this is such a fab post Jenny. Really crammed full of tips to really help people get gorgeous photos like yours. And a lot of the tips would apply to product photography for reviews or interiors too. Fab! x
Oh thank you so much Lucy for such complimentary words. You are so amazing you could easily do it too. Yes I never thought to use the same for reviews and product photography great idea. Thanks for all the love and support.
You’ve got a real talent for food photography! Thank you for sharing these expert tips. I’m nit much of a baker, but can surely use your advice for my food photos.
Thanks Tarana so lovely of you to say. I love food styling and practicing my photography.
You are so talented and should definitely be snapped up by a magazine. I struggle for time to set things up, as I am always looking after Baby too and we too have shocking light. But is is an area that I really want to up my game in, so thanks for much for the tips x
Thanks Aby. Oh yes I have my two babies at my feet all the time too. It’s tough isn’t it? I usually let them stir or help me set up so they get involved too. And they love testing the food too. Lol
Great tips Jenny – your food photos look amazing. Thank you for sharing 🙂
Thanks Louise. I have a lot to learn and practice still for where I want to be someday but I do love it so very much.
Love these tips Jenny, I will definitely be making use of them. Just need to actually be able to bake something worth sharing now 😉
This is my problem hunny I am no chef but want to style and photograph beautiful food. Catch 22 if I do say so. Lol
Great tips. Most of the time, I’m snapping while also cooking with a toddler, so the pics never quite come out as good as I’d like – I need an extra pairs of hands. But I could do more with staging the final shot of the dish. This has inspired me, thank you. #ShareWithMe.
Yes I should have made an extra tip how to style with kids around. Lol I have two young tots myself at my feet the entire time and you have to be quick with the styling and snapping I do try to get them involved in the cooking or baking. Stirring and handing me things and then styling and photography while they either are napping or taste testing the food to the side of me. I used to carry mm in a sling while photographing food. Hahaha
This is such a good post! Your styling is gorgeous. Thanks for sharing
#sharewithme
Thanks Megan for your kind words. It’s definitely a passion of mine.
such great photos! your posts always make me so hungry! theres so much that goes into getting that great shot but it pays off thanks for sharing some fab tips! x
Thanks that means I am doing something right. Hahaha engaging with my audience and my food. Lol sometimes it’s luck and other times it’s just the 3,000 shot hahaha practice helps for sure. My first food recipe shoots were horrible.
Great post! I picked up so many tips. Love your photos. I’m working on my food styling and still have a long way to go. Sometimes it works and others it doesn’t. Not always easy when hungry family waiting for food!
Oh yes sometimes I get it so wrong I just start all over again. Lol but sometimes I get it right and just love it and feel proud. Keep it up. Practice helps. Bet yours is lovely.
Fab post and lovely pics – love the concept of the props x
Thanks hunny. Oh yes anything is a prop.
That ice cream sounds heavenly – one to bookmark for the summer I think!
Your styling is fab x
Thanks it’s actually one of my most favorite recipes I accidentally made. It’s so delicious for summer.
These are some really useful and simple tips to make food styling a breeze at home (I used white cardstock and things around the house to take pics as well!). I always love your instagram posts when you’re making something in the kitchen, so it’s nice to see the work that goes on behind the lens to get your looks. Thank you so much for sharing & hosting #sharewithme this week. I can’t wait to read through the rest of the links 🙂
Thanks Maria that’s so sweet of you. Thanks for the kind words and support all the time.
Great tips there and some great photos – hope you’re having a fab trip too x #sharewithme
Thanks hunny. Trip has turned for the worse with horrible weather and being confined into our hotel as its flooding everywhere. But we are making the most of it. Glad you like the tips.
Getting hungry now seeing this considering I haven’t had any lunch yet. Brilliant post and great tips. Hopefully I will be able to share something soon. #sharewithme
Sorry I should have wrote a warning at the beginning will make you hungry and drool. Hahahah glad you enjoyed what I have been learning. Lots more to share soon.
These are beautiful photos and delicious looking food! Great tips. Now if only I would remember all of them. I love to cook too and would love to blog more about it. Problem is though when I’m cooking, it’s always a rush and chances are I’m also rushing between giving in to whatever demands my four-year-old wants, to making sure our food doesn’t burn. #sharewithme.
Yes I have had things burn and go in the trash as I have two tots at my feet all the time too. Lol glad you enjoyed my tips here. You can always pin them to a board to recall later. Hahaha I love learning about photography and food styling but definitely takes practice.
Your photos are stunning Jenny – think my favourite it the lemon cocktails. Thanks so.much for sharing your tips – there are definitely things here that hadn’t occurred to me. X #sharewithme
Thanks Sam oh yes those cocktails tastes as good as they look. Lol
This post is just what I wanted to read right now! I just did a piece on food and really struggled with the styling. it’s much harder capturing something cooked than raw, I found! These tips are great and your photos are fantastic! If I were a magazine I’d snap you up! I want to eat everything you’ve shown above. Loved this post hon! Thanks again for picking me as your favourite from last week, I was so flattered and touched. Hope you had a lovely time with your mum in Venice! Jess xxx
Thanks Jess you are too too sweet. Love your comment, absolutely made my night. Oh course you are a share with me favorite. I love the way you write.
Great tips! Love your use of props. My photography on the blog is totally rubbish but I find that I only have time to focus on what I write; maybe in the future I can do a bit more. I love baking but have only ever shared one recipe. x
#sharewithme
That was me at first. I now only share about once a month a food styling and recipe post. But it’s fun to get creative with it.
Brilliant tips – thanks Jenny! I’m an awful photographer, I just can’t style anything to save my life but it’s something I really want to improve on so I’ll be checking back here when I finally cook something again!! Mim @ http://www.mamamim.com #’ShareWithMe
Thanks Mim. You can always pin it to a board for later references. Lol I bet you are better than you think.
Gosh this post is bursting with information Jenny – thank you for inspiring us! I was going to pick out some of my favourite shots but it’s so hard….I love the colours in so many but particularly the watermelon and balsamic salad. Such fresh vibrancy. I’m rubbish at this so thanks for the tips. x
Thanks Suzanne so sweet of you to pick a favorite. I love how great that recipe for the watermelon salad came out both for taste and food styling. It was so fun.
This is brilliant Jenny, I’m aways wondering how best to photograph my recipes (my earlier ones are downright embarrassing!) thanks for sharing such a useful post.
Oh yes my first and even up to about tenth recipe on my blog I need to reshoot they are so embarrassing just all a part of the journey though isn’t it? Lol practice helps.
Your photos are always perfection, thank you for all of the great advise 🙂
Thanks Erin that’s sweet of you. They weren’t very nice not too long ago so I came along way but lots to still learn.
Love your food styling, and these are great tips x
Thanks Sara. I love it and it’s so fun to get the creative side of my brain flowing. I am no crafter but food styler for sure. Lol
Great photos and tips. I am rubbish at taking photos so will taking this advice on board. #sharewithme
You wouldn’t believe the horrible photos I used to take just recently too. Check out some of my first recipes I put up compared to recent ones. It’s also embarrassing. No wait it is. I need to go back and reshoot them. Lol you can do it with practice.
Fab tips Jenny, your shots are just gorgeous and I remember you saying when you started out that you wanted to up your game with styling and just look at you- wow, your shots are utterly professional and so, so beautiful. A testament to your talent and hard work.
I love your tenacity and get up and go, I share it too. I always clicked with Americans at uni, some are still my best friends to this day, and that passion and drive seemed a running theme with them, that ambition to be the best they could be. Loved it and love this, thanks for linking up to #tastytuesdays.
P and I have a lot of fun styling and shooting together. I used to work with production designers a lot when I was directing, working on setting up shots be it for commercials or drama, love how creative you can get in every frame.
Thanks again for linking this up to #tastytuedays x
Ahhh thanks Vic that’s the best message I have ever got. Truly beautiful and such kind words. I have so much I want to do and so little time. My list to learn is utterly endless. Definitely something they teach us in America to strive higher and higher no matter what. And that those dreams can come true. I love that and I hope I teach my kids that same thing too. Thanks for hosting. Glad you liked my tips.
Wow – fantastic photos! We are not ‘foody’ at all – but love looking at other peoples posts x
Thanks. Oh yes I could pour over others food photography all day long too. Beautiful.
These are fab tips Jenny! I always love your food posts and instagram photos, I have written a couple of food posts but really do struggle with making my food look nice! I always end up with the same background (the table) or things in the way like papers or bottles of wine!! Haha. I will be trying some of your tips out next time. X
Thanks Julia. Happy to pass on the things I am learning. It just takes a little reset of creativity and practice.
Great tips and what lovely photos, I just stared at that cake and it made me drool a little bit! Thank you for being such a great host of #sharewithme
Carolyn
http://stylishmemories.com
Thanks Carolyn. Good to make you drool. Lol I love looking at styled food photos they are doing something right if you want to drool. Hahaha I have a lot to still learn though.
What a great post – thank you for sharing these fab tips!
Thanks Lina. Glad you enjoyed it.
Jenny you are super talented at this, i love your photos they are beautiful, I have so much to learn where photography is concerned x
Thanks Sarah. Oh so do I. This is just what I have learned in 18 months. I have so much more I want to do and learn too.
Wow you are so creative! I’d never have time to think of all this as I bake, I like to just get on with it without any stress – but I’m sure it all comes naturally to you. I’m like you, not a fan of cooking but I love baking! x
I wish I was better so I could actually practice my food photography but sadly I am not and so my own recipes in my head are limited lol plus I keep eating all the baked goods. Never a good idea when you are good styling each week. Lol need to do more healthier options.
My food shots (there aren’t many) are so boring, even when I try to style them. I do think baking/biscuits/chocolates are easier than meals, but you’ve given some great tips – and just seeing the examples is helpful.
I just have limited existing props or crockery – and don’t have the storage to stock up on more.
Ya I was the same. I buy a lot from charity shops or just use things that are already around the house. Anything can be a prop. Use scrapbook paper for backgrounds too it’s cheap and your options are endless
Your food pictures always make me hungry!
They are stunning and would be quite at home in any recipe book. In fact they are better than most recipe books.
#sharewithme
Ahhh thank you so much. That is such a lovely compliment and made my day. 🙂
Wow- gorgeous photos *wipes drool off chin* and great tips! Thanks for sharing, I’m going to try and put some of these to good use. Oh and thanks for hosting, I’m new here and looking forward to reading some great posts from new peeps!
#sharewithme
Thank you so much darling. Welcome to SWM and I look forward to reading your post. Enjoy blog hopping. Thanks for linking up.
I’ve never heard of “food styling”. I didn’t even realize it was a thing. Your pictures are beautiful though.
Thanks hunny. Oh yes there is a whole culture to food styling out there. Especially on Instagram. Love it.
Wow you are definitely talented at food styling, I can never seem to get it right but am going to follow your tips! This post has made me seriously hungry…
Becky xx
Thanks Becky. It just takes practice and moving around until you find your favorite side or style and using various props in the mix.
Great tips Jenny, your food always does look gorgeous! x
Thank you so much Jo.
Wow that has made me hungry, some great tips and it all looks amazing.
Thanks Caroline. All my recipes are super easy so try away!! I love food styling and after a little over a year my photos have changed dramatically.
I love your food photos, they are always so pretty and make me want to get cooking!
Thanks Kate. Oh that’s good means I am doing something right. 🙂 I have lots to still learn too and share with everyone.
I love your food pics, they always make me drool and that to me means they are pretty fantastic!! 🙂
Thanks hunny what a lovely compliment. I feel like I can always do better and wish I could bake and cook more just to practice. I need a chef to come let me practice on their masterpieces. lol
Fantastic post, definitely saving this for next time I am doing some styling! X
Thanks Lisa. You are doing great with the little tips I gave you. You don’t need these. Lol
All these photos of food have made me so hungry at 7am in the morning. And I love the lucky charm cake, lucky charms always remind me of the day I came home with my son as my husband got a box of them for breakfast as a surprise.
I have never though to photograph food like this. Thank you for this post as it has really made me think and want to take more time over my food shots. #sharewithme
xx
That’s fantastic. I am glad to pass on the things I am learning and finding that works with food shots. I just need to get better baking and cooking so I can practice more with props and styling. hahah Probably not the best post to read before breakfast would make anyone hungry lol
Your tips certainly work as I would happily sit and eat everything I see here right now! I am always snapping pictures of food, particularly cakes I make, never thought about styling it before but just might after reading your post!
Thank you so much. I could photograph food all day long, I just need a chef around to cook all day long for me to have pretty things to practice on. Glad you liked my tips. Happy snapping!
Oh yum! Now I am hungry. Thanks for the food styling tips. I am new to trying to photograph food – still at the “oh, crap, is that a candy wrapper in the photo stage 😛
Hahah I do that alot edit it out is easier than reshooting. lol It’s a learning curve and I have changes my photography so much in just 20 months. Just look at my horrible photos at the beginning. hahah they are embarrassing.
It all looks wonderful and it definitely makes me hungry!
I am OK at cooking, but baking is definitely not my game. I don’t know why. I used to like it, but the bad results discouraged me once and for all.
#sharewithme
Thanks that’s how I feel about cooking. I always ruin meat and fish. Wish I was better at it.
This is exactly what I need in my life! Thank you so much for including so many amazing tips and gorgeous pictures. I will never be a brilliant photographer but I can certainly improve. Wonderful post xx
Oh Esther you never know. If you look at my photos in just 20 months it’s a massive difference.
Wow Jenny! I really enjoyed reading this post and have learnt a lot! I always drool over your food posts on IG 🙂 p.s i must make those cheese and bacon twists my mouth is just watering thinking about them! 🙂 xx
Thank you so much Kerry. hahah Those seem to be the most popular ones of my recipes too! They are so easy to make. Try them!
This is so helpful, thank you for sharing it! I’ve actually book-marked this post for future reference, food photography is a big downfall for me x
Thanks hunny. Oh yes you can improve so much in little time just takes a few tips and practice. I have changed so much in only 20 months. Just look at my old photos. lol embarrassing.
I’m certainly no ‘foodie’ post reader or writer Jenny but you can clearly see the effort you put into your photography. Even down to considering the colour wheel and then those beautiful, rustic props! How you find time to do all of this is incredible and I take my blogger’s hat off to you!
Oh thank you Carol that means a lot. Somedays I feel like my head is cut off and I am running without it. Lol but glad you like it.